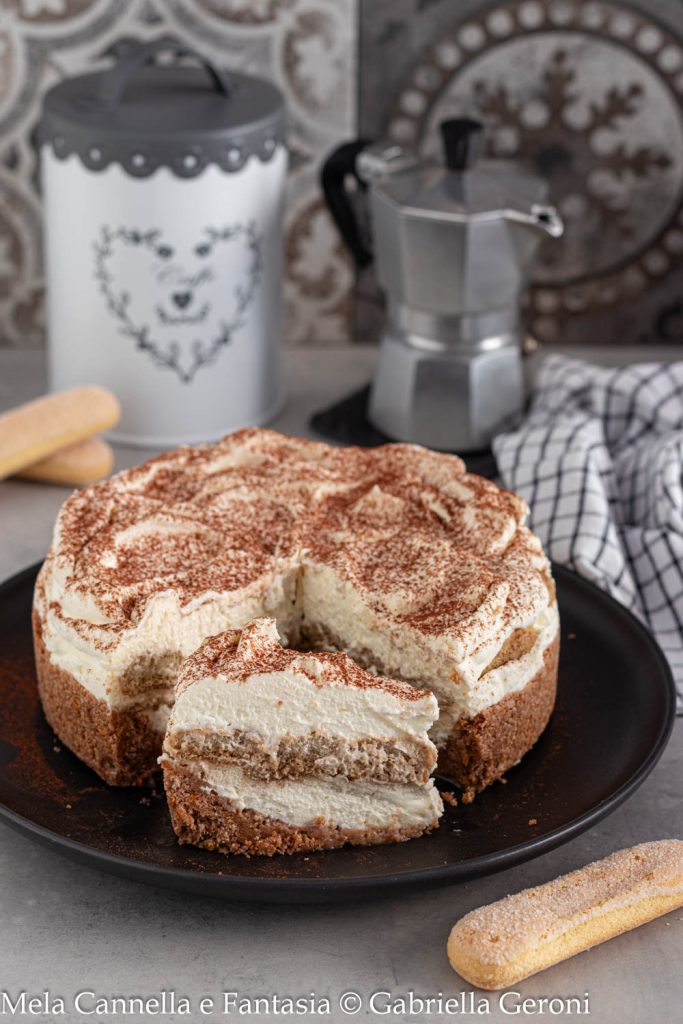
If there is one dessert that everyone agrees on, it is tiramisu. But what happens if we turn it into a fresh cheesecake, creamy and above all, no-bake? The result is the no-bake and egg-free tiramisu cheesecake, the perfect dessert for your summer evenings!
The egg-free and no-bake tiramisu cheesecake is an easy and fast summer dessert: prepared with a base of cookies and butter, filled with a cream of mascarpone, cream cheese, and whipped cream and a central layer that will surprise you! No baking, just chilling in the fridge and cocoa powder before serving.
The cold tiramisu cheesecake is prepared in minutes, requires no oven or raw eggs, and is so creamy it melts in your mouth. A clever alternative to the classic tiramisu, fresh and irresistible.
Forget the oven on for hours: this recipe is designed to let you enjoy the enveloping flavor of tiramisu in a new and irresistible guise.
The crunchy base of crumbled cookies and butter embraces a velvety cream of cream cheese and mascarpone, enriched with semi-whipped cream.
And then the surprise! In the center, a layer of ladyfingers soaked in coffee.
Whether you are a lover of traditional tiramisu or just looking for a fresh and delicious dessert, this cheesecake will win you over at the first bite.
It’s ideal for dinners with friends, a family lunch or simply for a sweet treat on a warm summer day.
This cold tiramisu cheesecake without eggs combines the irresistible creaminess of cheesecake with the timeless taste of tiramisu.
All in a lighter and safer version, ideal for those who avoid raw eggs. No oven, few steps, zero stress. It’s perfect!
Let’s see together how to prepare this delicious no-bake summer dessert with step-by-step photos, but first, I’ll gift you some other fresh and easy recipes!
- Difficulty: Easy
- Cost: Medium
- Rest time: 12 Hours
- Preparation time: 30 Minutes
- Portions: about 10-12 people
- Cooking methods: No-bake
- Cuisine: Italian
- Seasonality: All seasons
Ingredients
- 7 oz Digestive biscuits (or to taste; whole grain or chocolate also work)
- 3 oz butter (lactose-free for intolerants)
- 2 teaspoons unsweetened cocoa powder (optional, but recommended for a more 'tiramisu' flavor + as needed to sprinkle on top before serving)
- 7 oz cream cheese (lactose-free for intolerants)
- 9 oz mascarpone (lactose-free for intolerants)
- 10 oz whipping cream (lactose-free for intolerants. Alternatively, you can use pre-sweetened vegetable cream. In that case, reduce the powdered sugar to 40 grams)
- 2 oz powdered sugar
- 8 ladyfingers (quantity may vary based on the diameter of the mold)
- as needed coffee (to soak the ladyfingers)
- as needed unsweetened cocoa powder
Tools
- Springform Pan
- Bowls
- Mixer
- Spatula
- Parchment paper
- Sieve
- Hand Whisk
Steps
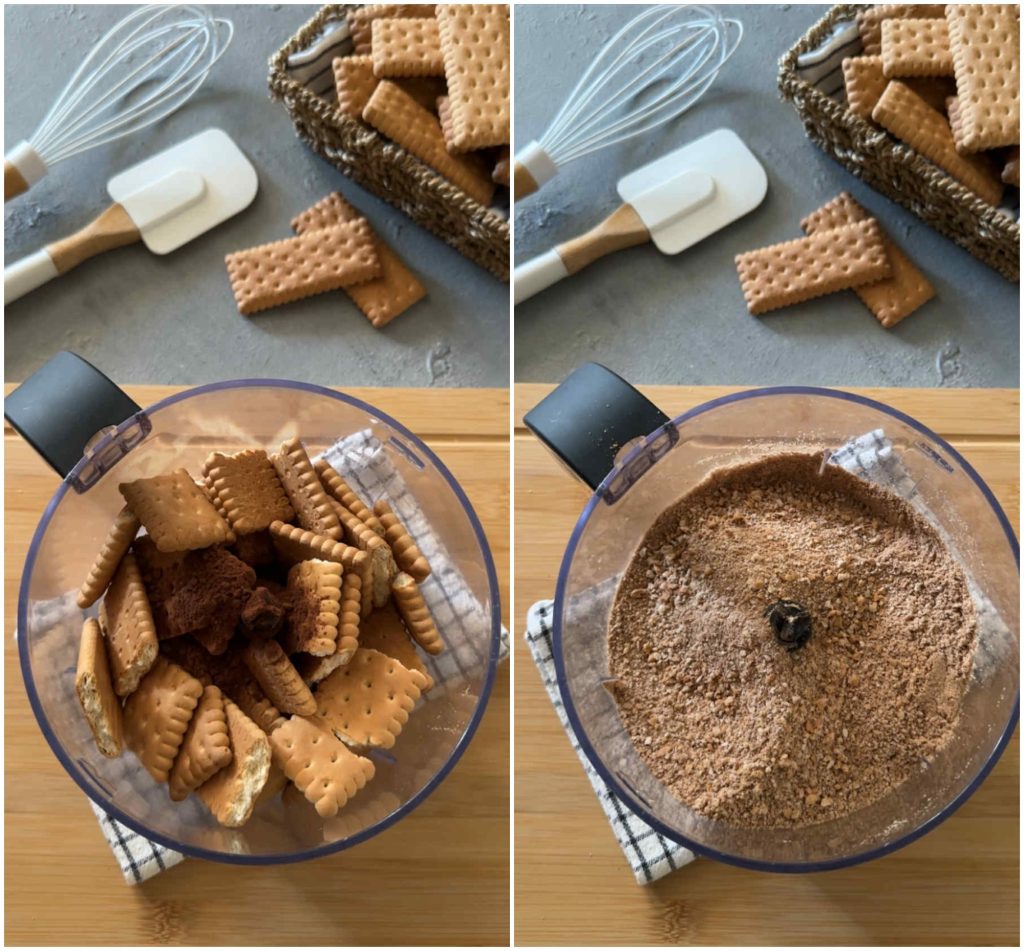
Start by finely crumbling the biscuits: you can use a food processor or place them in a food bag and crush them with a rolling pin.
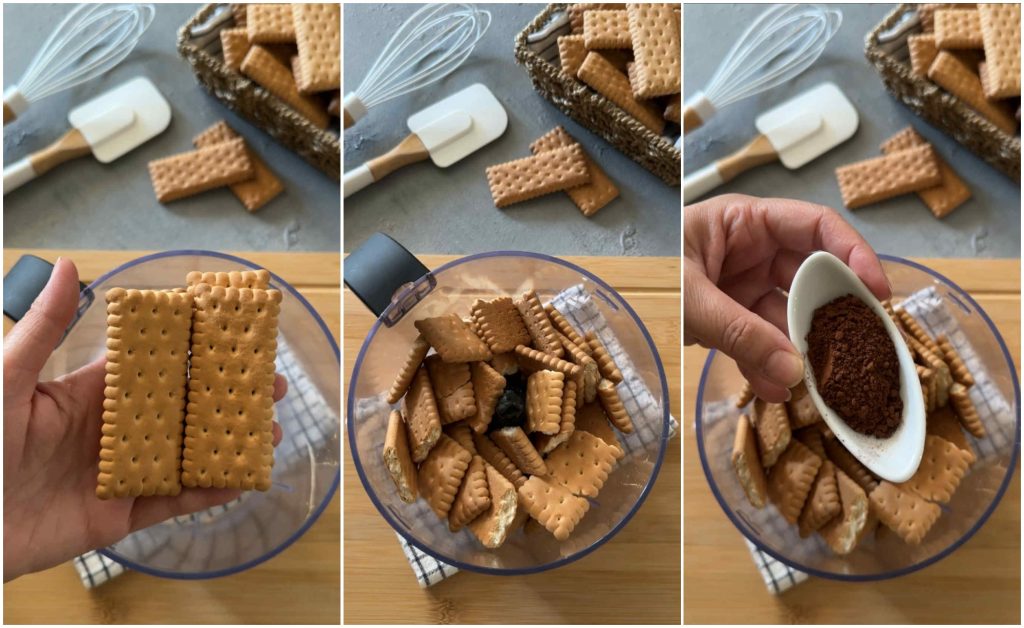
Pour the biscuits into a large bowl and add the unsweetened cocoa (you can also choose cocoa biscuits directly).
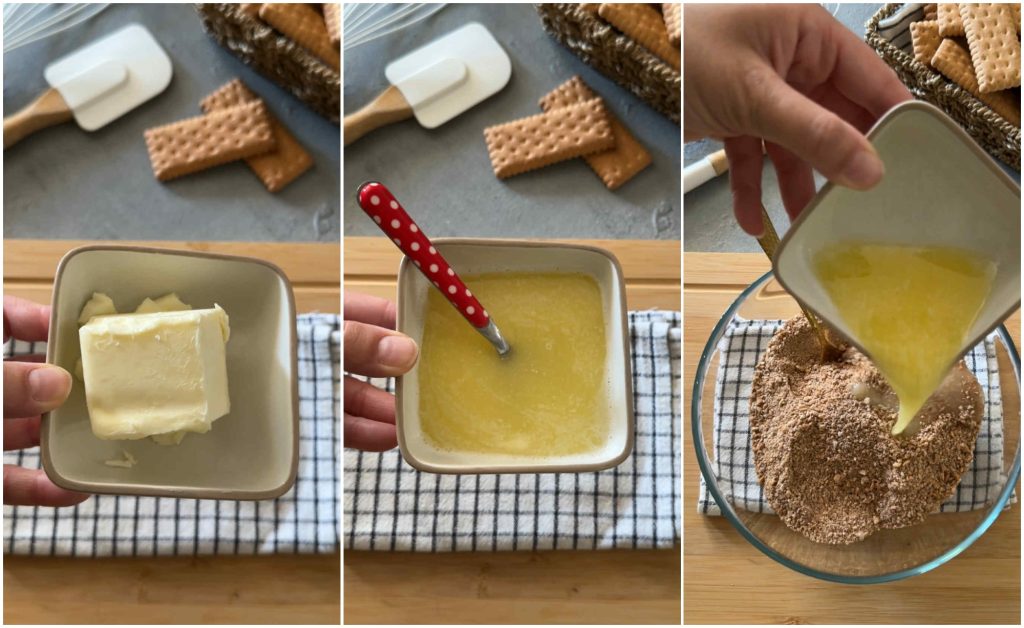
Melt the butter and add it to the crumbled biscuits, mixing well until you get a moist and sandy mixture.
Line a 20-22 cm springform pan with parchment paper on the bottom and along the sides to facilitate removal.
Pour the biscuit mixture into the mold and spread it on the bottom, also raising it on the sides, compacting it well with the back of a spoon or the bottom of a glass.
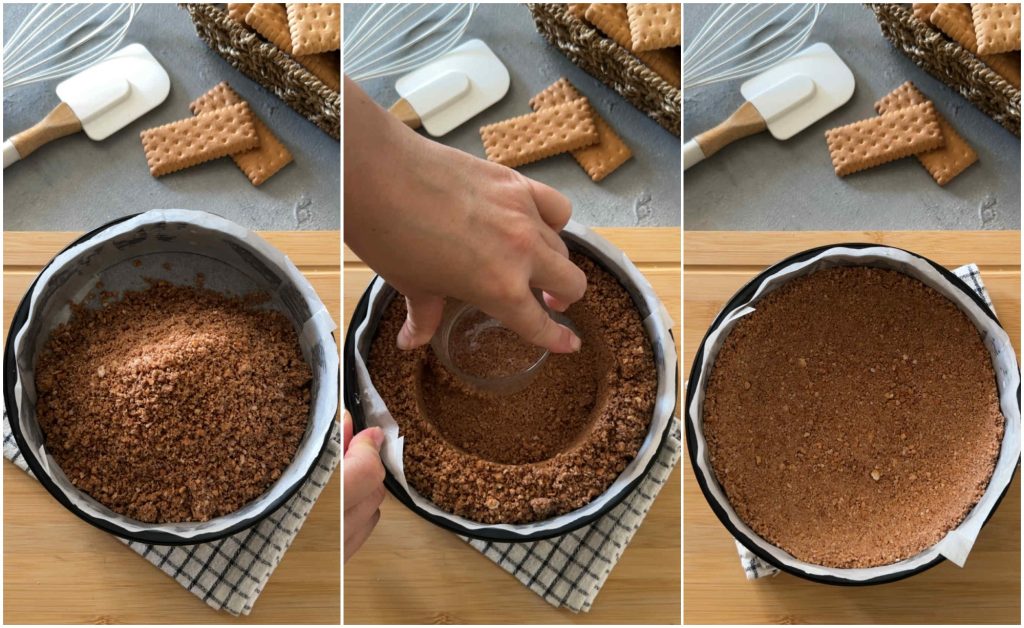
The edges should reach at least halfway up the mold to contain the cream.
Refrigerate to firm up for at least 15 minutes (do not use the freezer to avoid the base hardening too much and cracking when cut).
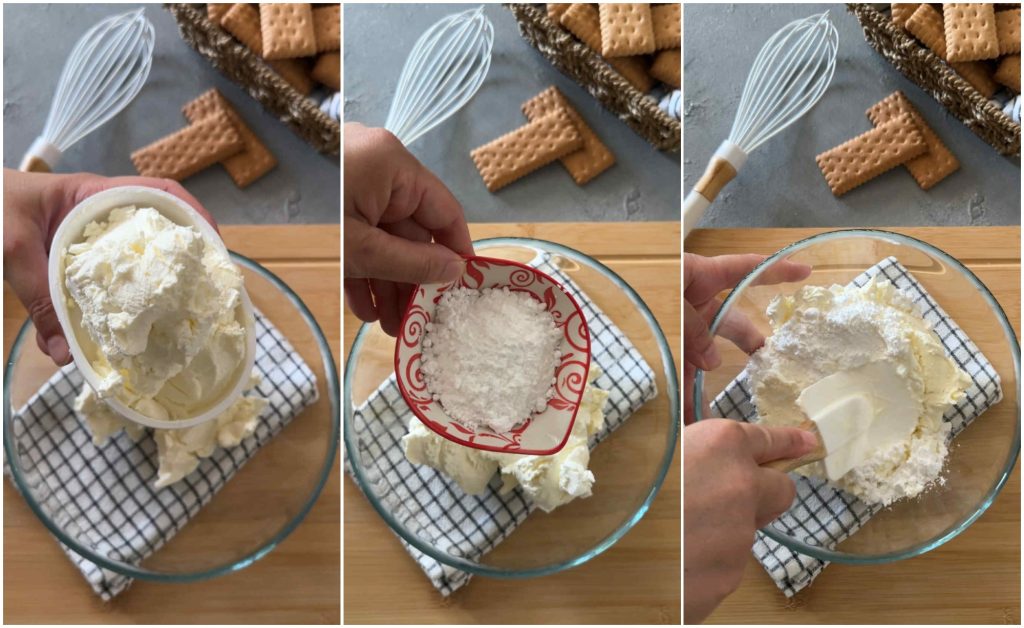
In a bowl, mix the cream cheese and mascarpone with a hand whisk or a spatula until you get a smooth and homogeneous cream. Add the powdered sugar and mix again.
Separately, briefly whip the very cold cream from the fridge until achieving a semi-whipped consistency (it should remain soft and not too firm).
Add it to the cheese mixture in several batches, gently mixing from the bottom up with a spatula.
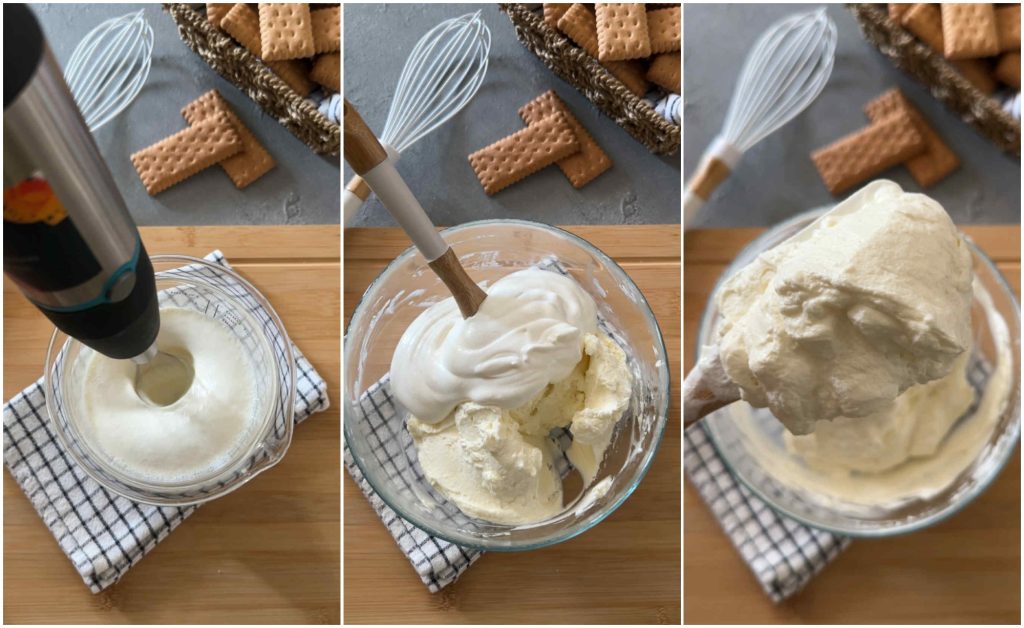
Tip: Do not use electric beaters after adding the cream, as you may end up with a lumpy cream. The ideal consistency is fluid but stable, soft and velvety.
Retrieve the now well-set base and pour half of the cream into it. Level the surface with a spatula.
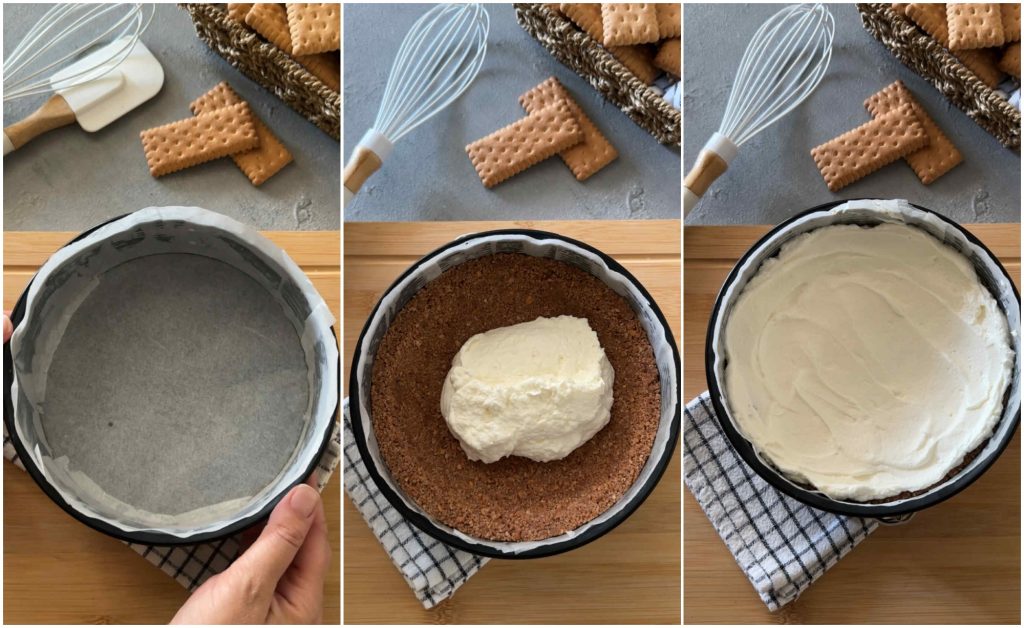
Quickly dip the ladyfingers one at a time in the previously prepared cold coffee. Be sure to soak them for just a few seconds (they should be soaked but not soggy), and place them on top of the cream, trying to cover the entire surface.
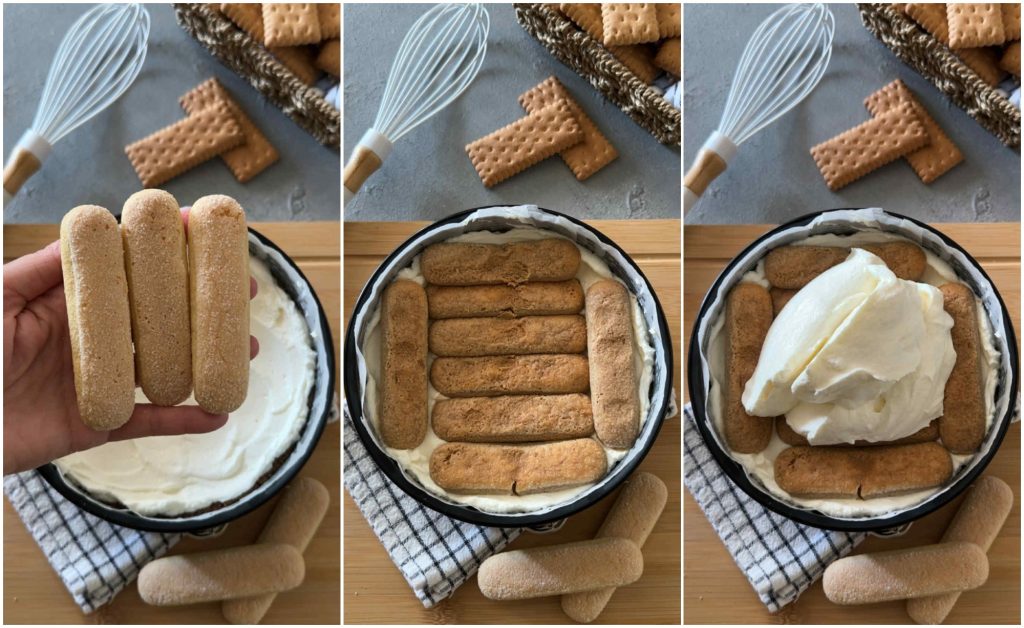
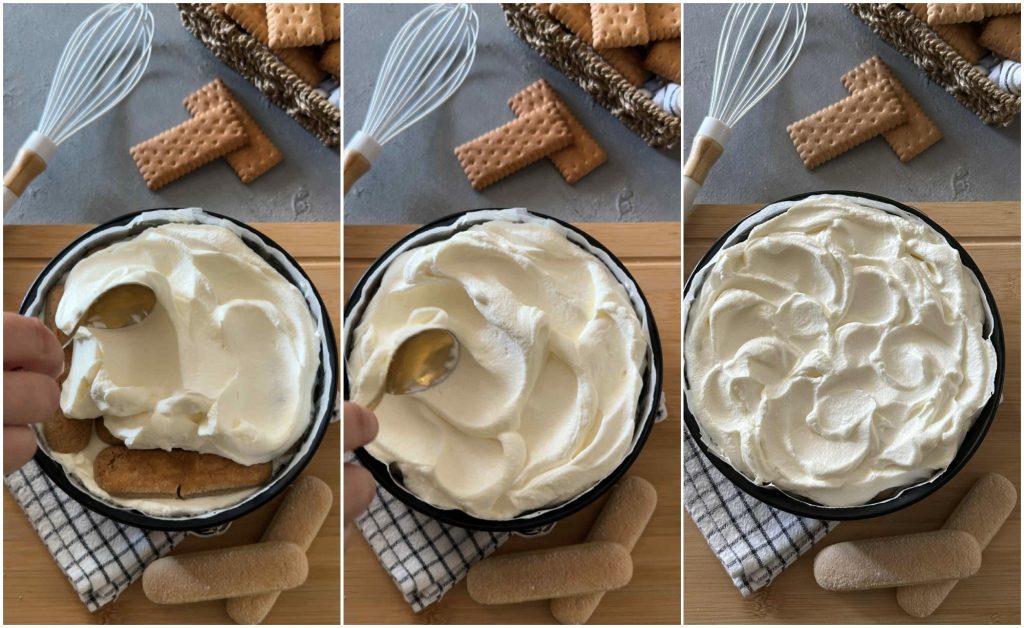
Pour the remaining cream over the ladyfingers and level. If you want a more scenic effect, create soft waves on the surface with the back of a spoon.
Let it rest in the refrigerator overnight. The rest time is essential for perfectly setting the cheesecake and blending the flavors.
Gently remove the cheesecake from the mold and transfer it to a serving plate.
When serving, generously dust the surface with unsweetened cocoa powder using a fine mesh sieve.
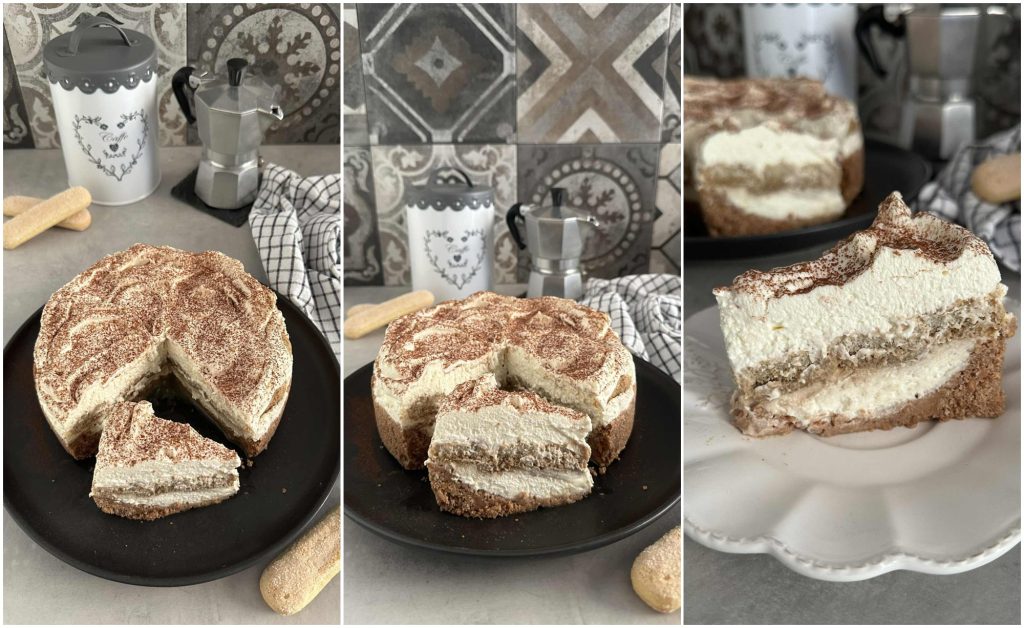
Extra tip for a perfect cut: run the knife blade under hot water, dry it and then cut. Clean it after each slice.
I hope you enjoyed this cheesecake! Go on… try it yourself! It’s delicious!
Be sure to read to the end, you’ll find useful tips for executing this recipe and a small gift for you 🩷
Article protected by copyright © – Gabriella Geroni © All rights reserved
💡 Extra tips for a perfect tiramisu cheesecake
Do not overmix the cream: excessive mixing can make it runny.
Always keep the cream very cold: it’s the key to good whipping.
Do not skip the rest: at least 6 hours, ideally overnight.
💡 SUPER DELICIOUS VARIANTS!
Chocolate Tiramisu Cheesecake
Add 100 g of melted dark chocolate to the cream for a more intense flavor. You can also replace half of the ladyfingers with chocolate biscuits.
Pistachio Tiramisu Cheesecake
Add 2-3 tablespoons of pistachio spread to the filling and top with pistachio crumbs instead of cocoa.
Tiramisu Cheesecake in a Glass (single-serving)
Prepare everything in cups or glasses, alternating cream, soaked ladyfingers, and cocoa. Perfect for buffets, parties, and single servings from the fridge.
Tiramisu Cheesecake with Nutella
Spread a layer of Nutella over the ladyfingers before adding the final cream layer. It will be an irresistible addition for the sweet tooth!
❓ Want a more stable version, suitable for summer buffets or to transport?
Here’s how to add some gelatin to make the cheesecake even more compact while keeping the same goodness and creaminess! Gelatin (or fish glue) is the right choice for those who want a firmer hold, suitable for buffets, transport, or very hot climates. Let’s see how to do it:
🔸 When to use fish glue:
To have a cream more compact and stable
If the dessert needs to stay out of the fridge for long (e.g., in buffets or parties)
To cut neater and precise slices
🧾 Ingredients (same as the original version, but with gelatin):
For the cream (with gelatin):
200 g cream cheese
250 g mascarpone
40 g powdered sugar
300 g fresh cream for desserts (unsweetened)
✅ 6 g of gelatin sheets (about 3 sheets of 2 g each)
Ladyfingers
Coffee
Unsweetened cocoa for decoration
✅ Procedure with fish glue (only modified parts):
Soak the gelatin in cold water for 10 minutes. In a small saucepan, heat 2-3 tablespoons of cream (taken from the total 300 g) without boiling it.
Strain the gelatin, dissolve it in the hot cream, and let it cool. Prepare the cream as in your recipe:
Mix cream cheese + mascarpone + powdered sugar.
Semi-whip the remaining cold cream.
Pour the cream with the dissolved gelatin into the cheese mixture and stir immediately to combine well.
Add the semi-whipped cream and gently fold in.
Proceed with the assembly: biscuit base, half cream, ladyfingers soaked in coffee, other cream.
Let it set in the fridge for at least 6 hours (better overnight).
Dust with cocoa before serving.
ℹ️ Important notes:
6 g of gelatin are perfect for a stable but not “rubbery” cream.
If you use pre-sweetened vegetable cream, you can heat it the same way to dissolve the gelatin.
Do not bring to a boil the cream with gelatin: it just needs to be hot enough to dissolve it.
FAQ (Questions and Answers)
Can I use only mascarpone without cream cheese?
Yes, but the cream will be more compact and rich. Cream cheese helps to lighten it and make it smoother. If you use only mascarpone, you can add a tablespoon of milk to soften it.
What is the difference between fresh cream and vegetable cream?
Fresh cream has a more delicate and natural taste but is unsweetened.
Vegetable cream is already sweetened, more stable, and often easier to whip.
If you use it, reduce the powdered sugar.Can the tiramisu cheesecake be frozen?
The answer is yes, but I don’t recommend it!
You can freeze the cheesecake whole or in slices. Wrap it well in plastic wrap and then in an airtight container.
It lasts in the freezer for up to 1 month. When defrosting, leave it in the fridge for at least 6 hours before serving. Better to add the cocoa only when serving.
Why don’t I recommend storing it in the freezer?
I have personally tried this, and I don’t like it because the butter in the biscuits, once the cheesecake is thawed, seems to “sweat” from the base. Also, the flavor of the cheesecake changes, so I prefer to store it in the fridge and keep it for a couple of days.
At most, halve the doses and make it smaller, but at least enjoy it fresh.How long should it stay in the fridge before being served?
At least 6 hours, but it’s recommended to prepare it the day before. The overnight rest helps the cream to stabilize and improves flavor and texture.
How to prevent the ladyfingers from breaking or becoming soggy?
Dunk them quickly, just one second per side. The coffee should be cold, not hot.
It’s important to barely dip the biscuits to avoid the coffee seeping from the base.
If it happens, don’t worry. Until serving time, you can “dry” the released coffee by placing the cheesecake on some kitchen paper. Make sure it is white, without coloring that could be absorbed by the dessert.Can I use other types of cookies for the base?
Yes! You can use:
1)Chocolate cookies
2)Plain biscuits without sugar
3)Amaretti (for a more pronounced taste)
4)Pan di stelle or chocolate shortbread (for an even more delicious touch)Is this cold cake suitable for children?
Yes, but if serving to children, make decaffeinated coffee or use a cocoa soak (milk + sweetened cocoa) for the ladyfingers.
How to make it more scenic for a party?
You can:
Use a piping bag to decorate the surface with cream puffs;
Add chocolate chips, coffee beans, or dark chocolate shavings;
Decorate with ladyfingers placed vertically along the edge like a Charlotte cake.