Today I would like to delight you with this easy treat, the cocoa and tangerine margherita cake. It’s a delicious and soft cake, but most importantly versatile, because it can be enjoyed as a pantry cake or as a cake for special occasions like Valentine’s Day, birthdays, and much more. The margherita cake is inherently gluten and dairy-free, so we can make it to meet specific dietary needs without sacrificing the richness of flavor, aromas, or elegance of desserts for grand occasions.
- Difficulty: Very easy
- Cost: Economical
- Preparation time: 25 Minutes
- Portions: 10
- Cooking methods: Oven
- Cuisine: Italian
- Seasonality: Winter, Spring, Valentine's Day
Ingredients
- 4 medium eggs (at room temperature)
- 120 g granulated sugar
- 10 g unsweetened cocoa powder
- 110 g potato starch
- 1 tangerine
- 1 g fine salt
- 1 cup cold heavy cream (can be lactose-free)
- 1/4 teaspoon vanilla paste
- 3 tablespoons granulated sugar
Tools
- 1 Mixer
- 1 Pan
- 2 Bowls
- 1 Piping Bag
Steps
To make the margherita cake, we need all the ingredients to be at room temperature, especially the eggs, to ensure yolks and whites whip perfectly. I recommend taking them out of the fridge at least 2 hours before making the cake.
Wash and scrub the tangerine peel thoroughly. Cut it in half and extract all the juice, which will be set aside for now. Then, chop the peel very, very finely.
Sift together the potato starch and cocoa to avoid lumps from forming or being present.
Separate the yolks from the whites, placing them in different bowls. The yolks’ bowl should be very spacious, since all other ingredients will be gradually added, and the final dough volume will quadruple.
Add sugar and grated tangerine peel to the yolks and beat them with an electric whisk at maximum speed for exactly 5 minutes.
After 5 minutes, turn off the whisk, add the starch and cocoa mix, the salt, and the strained tangerine juice. Turn the whisk back on and beat for exactly 15 minutes, until the initial volume of the mixture more than triples.
While the egg mixture is beating, butter and flour a round pan (or line it perfectly with parchment paper) 8 inches in diameter and at least 2.5 inches high, and preheat the oven to 340°F.
It’s crucial that the oven has reached temperature when we finish working the mixture.
Let’s move on to the egg whites we set aside.
I don’t recommend whipping them too early, as they might deflate.
Start whipping the egg whites three minutes before finishing the egg and flour mixture. The whisks need to be extremely clean.
If using standard electric whisks, it will take a maximum of three minutes (they shouldn’t become overly stiff), depending on the mixer’s power; however, if using a stand mixer with a designated whisk attachment, one minute will suffice. In both cases, start at the lowest speed, gradually increasing to the highest speed. The final consistency should be similar to well-whipped cream.
As soon as the egg mixture is whipped, gently fold in the whipped egg whites little by little, using a spatula or a hand whisk, moving from the bottom (of the bowl) upwards, almost forming a circle while simultaneously rotating the bowl to incorporate evenly.
Once all the egg whites are incorporated, immediately pour the mixture into the pan, tap it lightly on the table to fill any empty spaces and place it in the oven, at mid-height for 35-40 minutes, depending on the type of oven, whether static, fan-assisted, or bottom heat only, etc. To check the cake’s doneness, after about 30 minutes, insert a long skewer which should come out completely dry.
I recommend removing it from the oven immediately once baked to prevent residual heat from drying it out too much.
The cake will detach from the pan’s sides and settle once out of the oven.
Let it cool for about 30 minutes, then remove it from the pan.
Now we can decide whether to serve it as a pantry cake for breakfast and snacks, or fill it as a dessert for Sunday, as a refined end-of-meal treat, or for birthdays, etc.
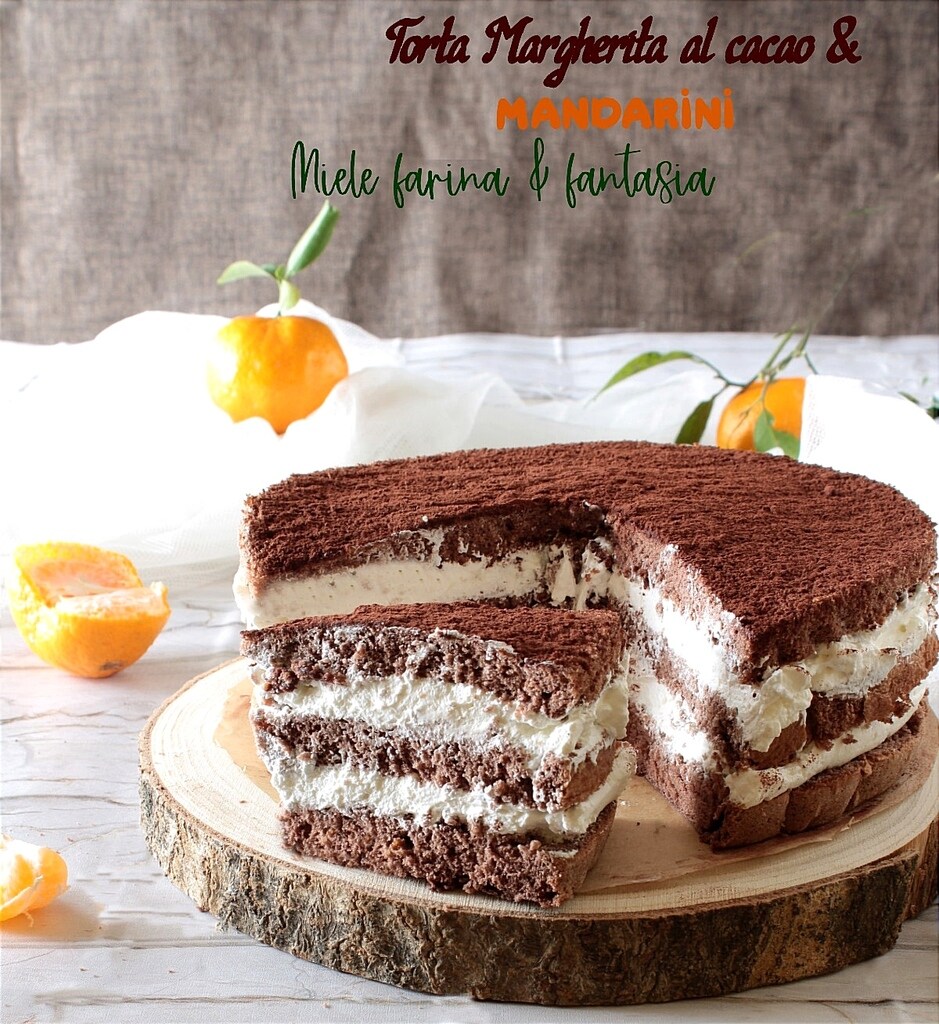
In my case, once the margherita cake was perfectly cooled, I divided it into three disks of the same height, using a sharp knife, and filled it with fresh whipped cream scented with vanilla.
If you wish, you can do as I did.
Whip the cold cream from the fridge, and when it’s nearly ready, add the vanilla paste, sugar, and continue whipping until you get a light, firm mixture (about two to three minutes in total at the highest speed).
I didn’t soak the cake as it doesn’t need it; however, if desired, you can moisten it slightly.
For each layer, 3 tablespoons of milk or fruit juice will suffice; or syrup made with water, sugar, and liquor of choice to be applied with a kitchen brush.
Cut the tip of a pastry bag, leaving a 3/4 inch opening (see photo below). This will allow us to have a uniform layer of cream of the same height.
Take the serving plate and place the base of the cake on it.
After moistening it with the brush, spread a thin layer of tangerine marmalade, then cover with half of the whipped cream using the piping bag without a nozzle, reaching the outer edges.
Place the middle disk on top without pressing down on the one below, even them out with your hands to ensure they are perfectly aligned, and repeat the operation (that is, moisten, spread the marmalade layer, and fill with the remaining whipped cream).
Finally, cover with the last disk, moisten it as before, and store the cake in a cake container, in the fridge, for at least 12 hours, so it absorbs and expresses its flavor and aromas more intensely. Shortly before serving the margherita cake, dust the surface with unsweetened cocoa powder.
Bon appetit
The extra idea. The cocoa and tangerine margherita cake can be customized according to our tastes and needs. The tangerine, for instance, can be replaced with an orange; in this case, we’ll use the juice of half an orange. The tangerine marmalade can also be replaced with any marmalade we like.
If the top of the cake isn’t perfectly smooth or flat, flip the cake so that the base (which will be perfectly flat and smooth) is on top. This will facilitate any decorations.