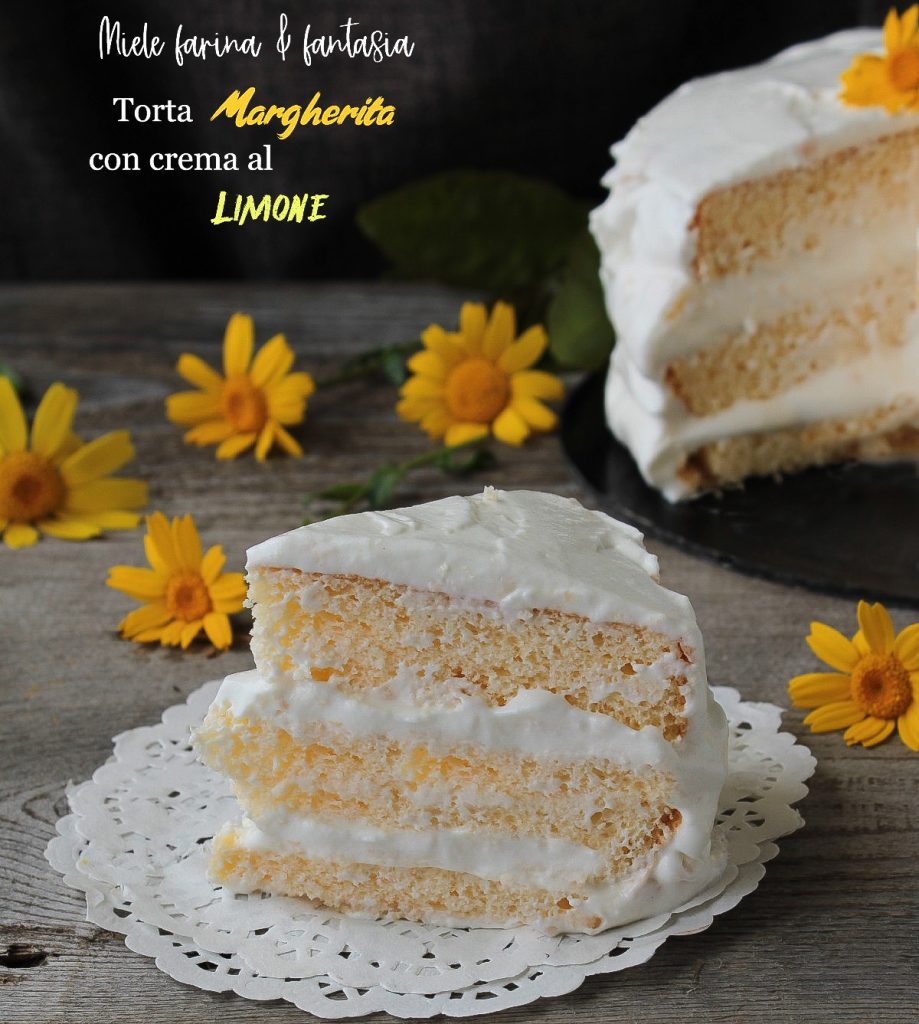
The Margherita cake, also known as “pasta Margherita,” is a very soft dessert made with potato starch, making it suitable for gluten-free diets. It’s very easy to prepare and versatile, as it can be considered both a pantry cake and a special occasion dessert to be filled and decorated for a dramatic effect. In this recipe, the Margherita cake, from the recipe proposed by Pellegrino Artusi in his book “The Science in the Kitchen and the Art of Eating Well,” is filled and decorated with a delicate yet delicious and fragrant lemon cream made without eggs. I will serve it for Mother’s Day, and you?
- Difficulty: Very easy
- Cost: Economical
- Preparation time: 30 Minutes
- Portions: 10
- Cooking methods: Oven, Stovetop
- Cuisine: Italian
- Seasonality: Mother's Day, Fall, Winter, and Spring
Ingredients
- 4 medium eggs
- 4.2 oz potato starch
- 4.2 oz granulated sugar
- 1 g fine salt
- 1 lemon (we will use the grated zest and the juice)
- 2.5 cups milk (lactose-free can be used)
- 2.1 oz all-purpose flour (or cornstarch)
- 4.2 oz granulated sugar
- 1 lemon
- 1/4 teaspoon vanilla paste
- 2 drops orange blossom or rose water (optional)
- 3/4 cup cold heavy cream (lactose-free can be used)
- 2 g fine salt
Tools
- 1 Mixer
- 1 Mold
Steps
To make the Margherita cake, I highly recommend using an electric mixer (or a stand mixer at speed 4), as, like with sponge cake, the ingredients need to be whipped for a long time, and doing it by hand would be quite tiring for the wrists. Pellegrino Artusi in his recipe recommends working the ingredients for half an hour, but at that time almost everything was done by hand; we can shorten the processing time thanks to electric whisks.
– Separate the yolks from the whites. The eggs should be at room temperature before using
– Place the egg whites in a very clean bowl (make sure the beaters are clean too) and whip them for no more than a minute and a half (they should not become very stiff) at the highest speed (usually electric mixers go up to 4-6 speed, adjust according to the power of your appliance, as not all mixers are the same in this regard).
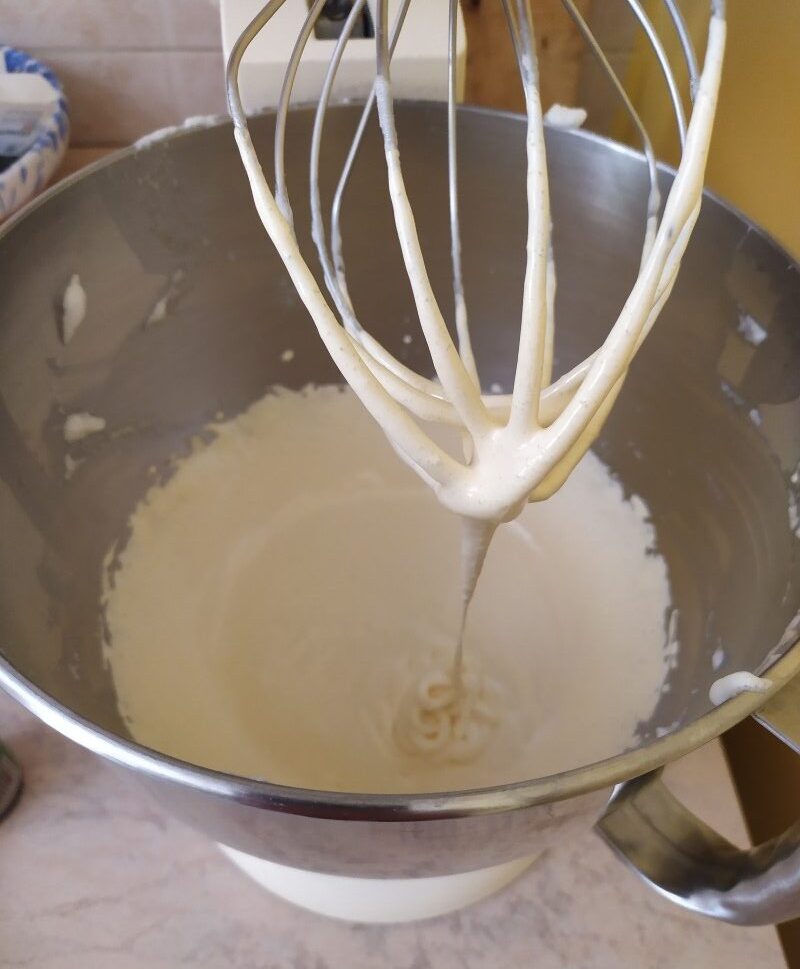
– In another bowl, place the yolks, granulated sugar, finely grated lemon zest (already washed and dried) (be sure to take only the yellow part without the bitter white inside) and beat them for 5 minutes exactly at the highest speed. When lifting the whisks, the mixture should flow smoothly and leave visible marks on the bottom, as you can see from the photo below.
– While the eggs and sugar are beating, butter and flour a 8-inch diameter and 2.5-inch height round pan very well.
– Preheat the oven to 338°F (static oven); or 320°F, still static, if your oven cooks both above and below simultaneously.
– The oven needs to have reached the correct temperature when we finish preparing the Margherita cake batter, as it must be baked immediately.
– After 5 minutes, add the sifted potato starch and lemon juice to the egg and sugar mixture, and beat everything for 15 minutes exactly at the highest speed.
– After 15 minutes, gradually add the whipped egg whites (3-4 tablespoons at a time) and gently fold them in by hand with a steel whisk, using a rotating motion from the bottom (i.e., from the bottom of the bowl) to the top, simultaneously rotating the bowl to ensure the egg whites are incorporated evenly.
Once the egg whites are fully incorporated, immediately transfer the whipped batter into the buttered and floured pan.
– Bake immediately at mid-height for about 30/40 minutes (cooking times may vary depending on whether you bake at 338°F or 320°F; however, perform a toothpick test after about 30 minutes if you notice the cake has already turned golden. The toothpick (I use skewer sticks) should come out completely dry.
– If the cake is baked, remove it immediately from the oven to prevent residual heat from drying it out, and let it rest for 10/15 minutes at most; then you can remove it.
When the edges of the cake have separated from the sides of the pan (as seen in the photo below), we can unmold it and transfer it to a wire rack to cool completely.
Now let’s prepare the lemon cream for filling and decorating while the Margherita cake cools completely.
In a saucepan, heat the milk (it should not reach a boil, just become very hot).
In another large pot, pour the sugar, grated lemon zest, vanilla paste, and drops of orange blossom water (or a scant teaspoon of limoncello or Strega liqueur, if desired), fine salt, sifted flour, and mix.
Once the milk is hot, slowly pour it over the dry ingredients, stirring with a steel whisk.
Now bring the pot to the smallest burner on medium/low flame, cook the cream, stirring constantly without leaving it, until it thickens and becomes very firm.
Turn off the heat, transfer the cream to a clean bowl, passing it through a sieve to make it smooth, press plastic wrap directly onto the surface of the cream, and let it cool completely, then transfer it to the refrigerator.
When the lemon cream base is cold, whip the cream (cold from the fridge). When the cream is thick enough, add the cold cream base and continue to whip for another minute until you have a fluffy and firm cream.
All that’s left is to fill the cake.
Cut the Margherita cake into three layers (or discs) about two centimeters (0.8 inches) each.
– You can decide whether to moisten the cake or not. Personally, I don’t moisten it because the cake absorbs the moisture from the cream and, compared to sponge cake, it is softer, less dry. If you decide to moisten it, a little will suffice.
If your cake has a “dome” on top, turn it upside down, so the swollen part is at the base.
Place the base of the cake on the serving plate.
– Ideally, you should spread a layer of cream about 0.8 inches thick. I use a piping bag for this.
-Take a medium-sized piping bag (there’s no need to insert a tip), fill it with a third of the lemon cream, and cut off about two centimeters from the end with scissors. This way, you’ll get a hole through which the cream will pass, about 0.8 inches wide. Additionally, with the piping bag, you can distribute the cream much more evenly. If you don’t have one, you can use the back of a spoon or a spatula.
Place the second disc (the middle part of the cake) perfectly on the first already filled, without pressing and distribute another third of the cream.
– Place the last disc perfectly on the second, again without pressing, ensuring all three are perfectly aligned.
– Finally, using all the remaining cream, decorate the outside of the cake with a small spatula.
The extra idea. Before filling the cake, spread a generous tablespoon of cream on each disc, then, with the help of a pastry brush, let it absorb, soak, well inside each layer, making the cake even softer. Then proceed as described above for the actual filling.
Bon appetit
If you wish to replace flour with potato starch or cornstarch as thickeners, it is best to dissolve them perfectly in cold milk from the fridge or at room temperature but never in hot milk (still adding other ingredients, such as sugar, spices, etc.), then you can cook the cream, which, within 5/7 minutes at most (small burner on medium heat without ever stopping stirring), will thicken perfectly.