Today I present to you Valentine’s chocolates, delicious no-bake coffee treats that can also be prepared with gluten-free and lactose-free ingredients. Valentine’s chocolates are designed especially for those who want to gift their loved ones, their dear ones, with homemade treats that are easy, elegant, no-bake, and without necessarily spending a fortune. These delightful chocolates with a soft heart can be enriched, personalized according to each of our tastes and needs. To give an additional “wow” factor, if I may say, the treats can be served in delicious and refined chocolate “boxes”, very simple to make.
- Difficulty: Very easy
- Cost: Economical
- Rest time: 12 Hours
- Preparation time: 30 Minutes
- Portions: 28
- Cooking methods: No-bake
- Cuisine: Italian
- Seasonality: Valentine's Day
Ingredients
- 9 oz 70% dark chocolate
- 6 oz plain cookies (also gluten-free)
- 4.5 oz coffee yogurt (also lactose-free)
- 1.7 oz espresso coffee
- 1 tsp unsweetened cocoa powder
- to taste chopped pistachios
- to taste grated coconut (coconut flakes)
- 3.5 oz 70% dark chocolate (in addition to what's leftover from covering the chocolates)
Tools
- 4 Aluminum Cupcake Liners
- 1 Brush
Steps
To make the chocolate boxes, we will need at least 4 small-sized aluminum cupcake liners, (about 1.2 inches high and 4 inches wide), flexible not rigid, and a food brush.
We will also need 16-18 paper cupcake liners for chocolates (in which we will serve the remaining chocolates not placed in the “boxes”).
Let’s start by preparing the coffee cookie dough that will represent the soft heart of our Valentine’s chocolates.
Coarsely crumble the cookies, without reducing them to powder. Add the coffee yogurt (or another flavor of your choice) and start mixing with a fork.
Now add the espresso coffee little by little, continuing to mix in the meantime. I recommend adding it gradually because depending on the cookies used, it might take a bit less or more liquid coffee. Personally, for this type of recipes, I use the “petit” type with and without gluten, to please everyone in the family; in the case of buttery cookies, however, it might require a slightly lesser amount of coffee.
Add the level teaspoon of unsweetened cocoa and form a sort of solid and compact dough, which we will cover and let rest for 10 minutes, to better absorb flavors and scents. It will not be necessary to add more sugar, but taste the dough and sweeten it according to your preference.
In the meantime, coarsely chop 250 grams of chocolate and place it in a heat-resistant glass or steel bowl, set it over a saucepan filled with two fingers of water, with a slightly smaller diameter, and let it melt in a bain-marie over low heat, stirring often or in the microwave if you find it more convenient.
While the chocolate melts slowly, take the cookie dough and shape it into balls of about 10 grams each; we should get 28 to 30 chocolates.
Prepare a sheet of parchment paper on which to place the treats after coating them with chocolate.
As soon as the chocolate is completely melted, turn it off but do not remove the bowl from the saucepan with the boiling water to prevent it from cooling too quickly.
Using a fork, dip the chocolates (3-4 at a time) in the melted chocolate, lift them up, let them drain for a moment (that’s why a fork is more suitable) and place them on the parchment paper, helping with another fork or spoon.
Continue until each treat is covered. Make sure to space them at least a finger apart.
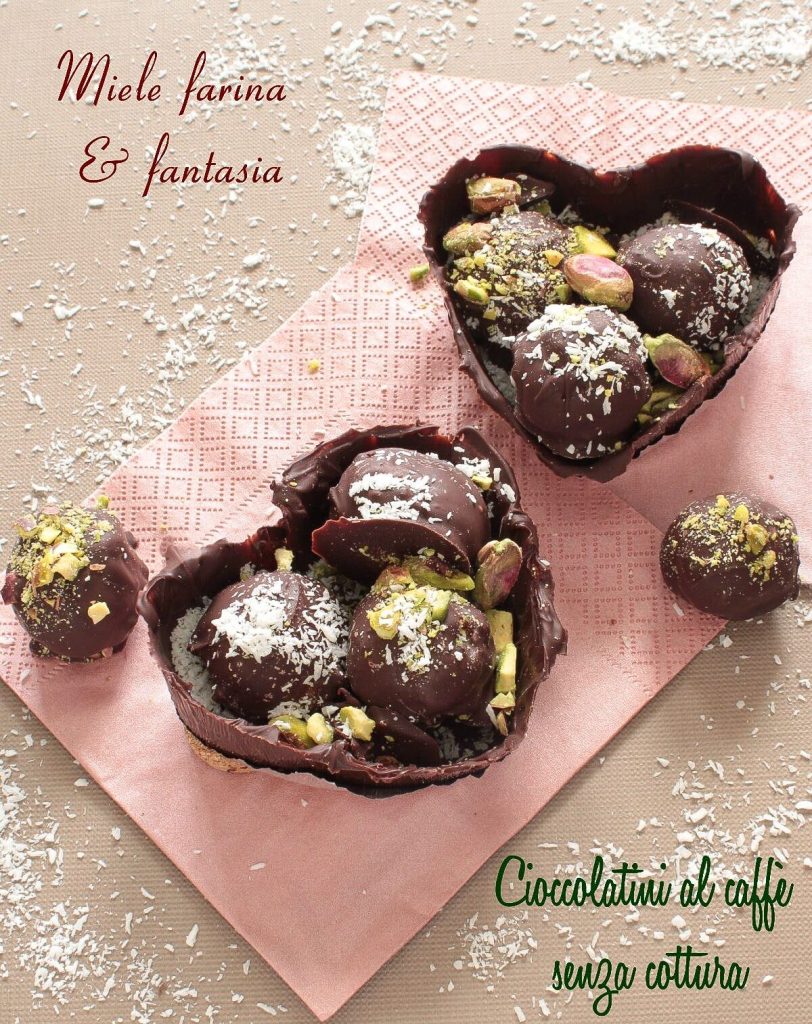
Before the chocolate dries completely, decorate the chocolates with chopped pistachios and coconut as you like.
As mentioned at the beginning of the procedure, part of the chocolates can be served in the boxes, while the remaining part can be served in the classic paper cupcake liners.
Now let’s proceed to prepare the chocolate “boxes”.
First a clarification: with the leftover melted chocolate in the bowl, I prepared 4 small boxes; this means that it was not necessary, at least for me, to use the other 100 grams of dark chocolate provided. However, I recommend always having a bit more available, because if one box breaks, we would have the possibility to “fix” it with a bit of melted chocolate or even remake it.
If the leftover chocolate is sufficient for 3-4 cupcake liners, proceed as follows: pour two tablespoons of melted chocolate into each liner (in the meantime the chocolate will have become a bit denser and therefore easier to spread inside the liner). Avoid spreading the chocolate on the slightly protruding edges of the liners, because when we go to remove them, the “boxes” might break. It’s necessary that the boxes are not thin, so be generous with the melted chocolate.
If the melted chocolate is not enough, add the other 100 grams provided, melt and once melted, turn off and wait 5/7 minutes before spreading it in the liners.
Let the boxes dry at room temperature, in a cool and dry place (not in the fridge, unless the temperature at home is excessively hot).
When the chocolate in the aluminum liners is dry and solidified, being very careful, cut a strip of the liner with scissors and remove it gently. If you wish, you can leave only the bottom part of the liner (as I did) because it will be the base on which to hold the boxes.
Fill the heart-shaped boxes with 3 chocolates, alternating the decorations and serve them.
Happy Valentine’s Day to everyone, young and old, in short, to everyone who loves each other.