Classic Neapolitan Pastiera: The Original Recipe for a 9.5-inch Tin:
Few things in the world make me as happy as a slice of freshly baked Pastiera. The creamy filling’s texture, the crisp, crumbly crust, and the aroma of orange blossom, lemon and a hint of cinnamon combine into something simply divine. Pastiera smells like home, family, and tradition… and I can’t wait to eat it all!
It does take a little effort, that’s true, but the result is absolutely perfect. Once ready, all that’s left is to enjoy it with a good hot coffee! In this version I reveal the precise amounts for the classic 9.5-inch tin, the one that guarantees ideal height and even baking. Making pastiera at home is a ritual that requires patience, but following my tips you’ll get a silky filling that won’t crack on the surface.
- Difficulty: Medium
- Rest time: 1 Hour
- Preparation time: 30 Minutes
- Cooking time: 1 Hour
- Cooking methods: Oven
- Cuisine: Italian
- Seasonality: Easter, Spring, Autumn
Ingredients for a 9.5-inch Neapolitan Pastiera
Here is how to prepare a Pastiera in a 9.5-inch tin.
- 2 cups all-purpose flour ("00")
- 1/2 cup granulated sugar
- 7 tbsp lard
- 1 egg
- 1 pinch salt
- 1 1/4 cups precooked wheat for pastiera
- 2 tbsp lard
- 1/2 cup milk (125 ml)
- 1 1/3 cups ricotta (about 12.3 oz / 350 g)
- 1 cup granulated sugar (for the filling)
- 1 egg
- 1 egg yolk
- 2 tsp pastiera aroma (or orange blossom)
- 1/3 cup candied citron (candied)
(Average values for a slice of about 150 g)
Calories: 485 kcal
Fat: 19 g
Carbohydrates: 68 g
Protein: 11 g
Sugars: 35 g
Fiber: 2.5 g
Tools
What you need for Pastiera (My favorite tools)
- 1 Aluminum pan pan
- 1 Food mill fine food mill
If you want to receive my new recipes every day in preview, you can follow them on my WhatsApp channel in real time.
Steps
Below is the procedure and tips for Your Neapolitan Pastiera for Easter
Let’s start with the filling so it has plenty of time to rest: put the precooked wheat in a saucepan with the milk, lard, orange zest, lemon or citron zest and a pinch of salt. If you like, add a pinch of cinnamon.
Cook over medium-low heat until it thickens to a cream-like consistency. Remove from heat and let it cool slightly.Then take a good ricotta—sheep or goat ricotta is recommended as it’s firmer and better for desserts. If needed, let it drain in a sieve the night before; always smooth it through a sieve once drained to make it softer and creamier.
Some people add the sugar and let it rest overnight.
Blend the ricotta with the sugar if you haven’t done that already. Add the beaten egg and yolk, the grated zest of one lemon, the grated zest of one orange, and the orange blossom and/or millefiori essence. I recommend 10 ml if it’s bottled, otherwise a small vial will do.
Always check the intensity of the aroma.
Also discover how to prepare the Orange Bundt Cake in the Air Fryer: the trick to make it very tall and fluffy!Mix everything well until you get a smooth, lump-free fragrant cream; finally add the candied citron. Set aside and move on to the shortcrust pastry for the pastiera.
In a large bowl put the all-purpose flour, the sugar, the pinch of salt and the lard. Work until you get a crumbly mixture. Then add the beaten egg, the grated orange and lemon zest and knead until you obtain a smooth, soft dough.
Let the shortcrust pastry rest wrapped in plastic wrap for 1 hour.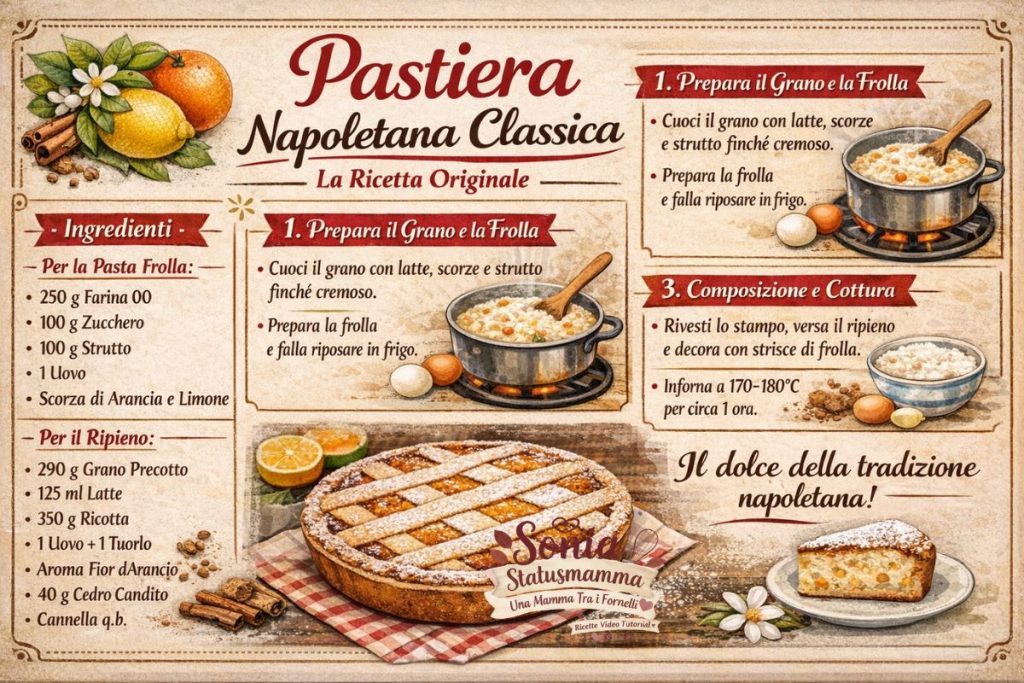
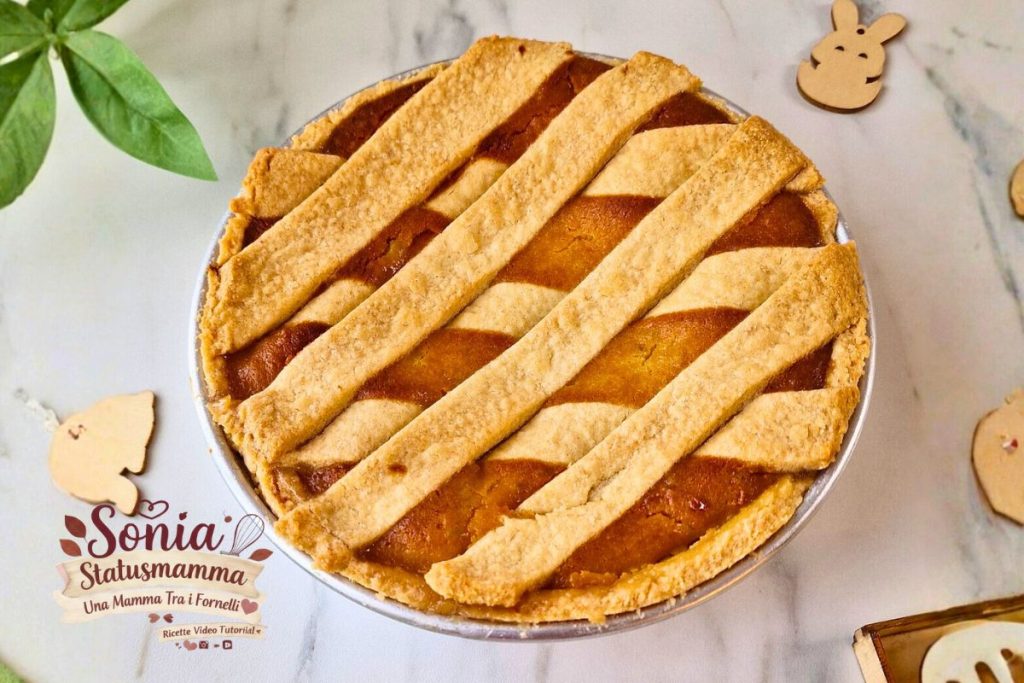
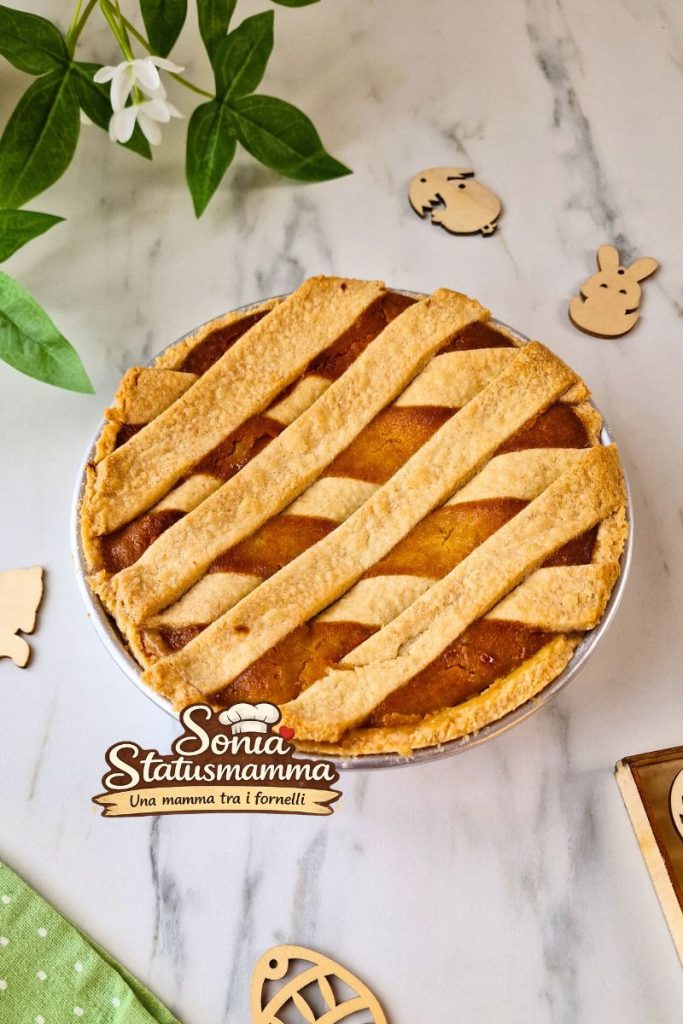
For the shortcrust pastry: Once the pastry has rested, cut it in half and roll out to a thickness of about 1 cm (around 3/8 inch), not too thick. Line a 9.5-inch pastiera pan greased and floured, use the prepared pastry to line it, trim the edges and fill with the prepared pastiera filling.
Cut 7 strips with a knife or fluted pastry wheel. Make the typical lattice on top of the filling arranged inside the pastry.
Bake in a static oven on the lower-middle rack at 338–356°F until golden on the middle shelf.
The filling will puff up during baking but don’t worry: when it starts to deflate and set, your pastiera tart is ready.
Let it rest until it is just warm.Serve your cake in slices with a dusting of powdered sugar. Happy Easter to everyone!
Follow me on FACEBOOK and on INSTAGRAM and on VIDEO TUTORIALS ON YOUTUBE to not miss new recipes
If you like pinning don’t miss the photographed recipes on PINTEREST!
TO RETURN TO THE HOME CLICK HERE!
Storage, tips, notes, variations…
Neapolitan Pastiera is a magical dessert that improves over time.
At room temperature: You can keep it under a glass dome in a cool, dry place for about 4-5 days. Do not put it in the fridge immediately, as it would lose its characteristic fragrance.
In the refrigerator: If it’s very hot at home, you can place it in the fridge after the first two days. Remember to take it out at least an hour before eating to fully enjoy its creaminess.
Freezing: You can freeze the pastiera once baked and cooled. Wrap it well in plastic wrap and it will keep for about a month.
Tips and Secrets for a pastry-shop result
The Ricotta: Use a well-drained sheep ricotta. My advice is to let it drain in a sieve in the fridge from the evening before: the less whey there is, the more compact and silky the filling will be.
The Wheat: For an extra-silky filling you can blend a small portion of the cooked wheat before adding it to the ricotta. It will give a finer texture that many prefer.
The Candied Fruit: Don’t skip them! Besides taste, candied fruit releases the moisture needed to keep the filling soft for days. If you really don’t like large pieces, chop them finely until they become almost a paste.
Notes and delicious variations
Chocolate Variation: For a modern version loved by children, you can add 80 g of dark chocolate chips to the filling.
Without Lard: If you don’t like lard or can’t find it, you can substitute it in the pastry with an equal weight of butter. The crust will be less “rustic” but equally delicious.
The Pan: Tradition requires the use of a sloped-edge aluminum ruoto. If you use a removable ring tin, be careful not to roll the pastry too thin on the edges to avoid tearing when unmolding.
Classic Neapolitan Pastiera: The Original Recipe for a 9.5-inch Tin
FAQ (Questions and Answers)
Questions about Pastiera? I’ll help you!
I know well that Neapolitan Pastiera can seem a bit intimidating: it’s a dessert of patience and precision. But don’t worry! To ensure a perfect result, I’ve collected below the answers to the questions you ask me most often and the little secrets I’ve learned over the years. Read them carefully before you start, so your Pastiera will not only be beautiful, but will become the queen of the Easter table!
1. Why did my pastiera “crack” or split on the surface during baking?
This usually happens for two reasons: the oven was too hot or you overworked the filling with electric beaters, incorporating too much air. Pastiera tends to puff up in the oven and, if there’s too much air, it will “collapse” when it cools, creating cracks. The secret is to bake it gently (maximum 338°F) and mix the filling gently by hand.
2. Is it true that pastiera should not be eaten on the same day it’s prepared?
Absolutely yes! Pastiera is a dessert that needs to “settle.” Fresh from the oven, the flavors are separate and the texture is almost unstable. After 48 hours, the wheat’s moisture blends with the ricotta and the citrus aromas reach their full balance. My advice is to prepare it on Holy Thursday to eat it on Easter Sunday.
3. Which type of wheat is best to use for a creamy result?
For real Neapolitan pastiera use the precooked wheat you can easily find in a jar. However, if you don’t like whole kernels under your teeth, take about a third and blend it with a mixer before adding it to the rest of the mixture. You’ll get that “silky” filling children love without losing the typical structure of the original dessert.
