The homemade ravioli made with a mold are the perfect solution for those who love fresh pasta but have little time. Using the proper mold is a quick and easy method that lets you make many impeccable ravioli, all the same shape and well sealed, in minutes. Whether you choose a meat or a vegetarian filling, with this technique you’ll shine at the table, bringing traditional flavor without too much effort!
- Difficulty: Very easy
- Cost: Low cost
- Rest time: 1 Hour
- Preparation time: 45 Minutes
- Cooking time: 45 Minutes
- Portions: 1 lb 5 oz
- Cooking methods: Boiling
- Cuisine: Italian
- Seasonality: All seasons
Ingredients for Ravioli with a Mold
- 4 eggs
- 3 1/4 cups type 00 flour (or all-purpose flour)
- 1 tsp olive oil
- 1 tsp fine salt
- 10.6 oz mixed ground meat
- 1/2 cup breadcrumbs
- 1/2 cup grated Parmigiano-Reggiano
- 1/2 1/2 tsp fine salt
- 1 cup ricotta
- 1 egg
- olive oil
Tools for Ravioli with a Mold
- Molds
- Rolling Pin
Steps for Ravioli with a Mold
Follow these steps to obtain an elastic and silky dough, perfect to work with the mold without breaking.
Prepare the “fountain”: On a pastry board (or a clean work surface), sift the type 00 flour and make a wide well in the center. Break the eggs into the hole, add the olive oil and a pinch of salt.
Start mixing: With a fork, gently beat the eggs while gradually incorporating the flour from the inner edges, taking care not to break the rim so the eggs don’t spill out.
Mixing the dough by hand: When the mixture looks grainy and the flour has absorbed the liquids, start working with your hands. Knead vigorously using the palm of your hand, “stretching” the dough and folding it back over itself.
Find the right consistency: If the dough seems too sticky, add a pinch of flour on the board; conversely, if it appears too dry or hard, slightly moisten your hands with a little water.
Patience is key: Continue kneading for about 10 minutes until the dough ball is perfectly smooth, homogeneous and elastic.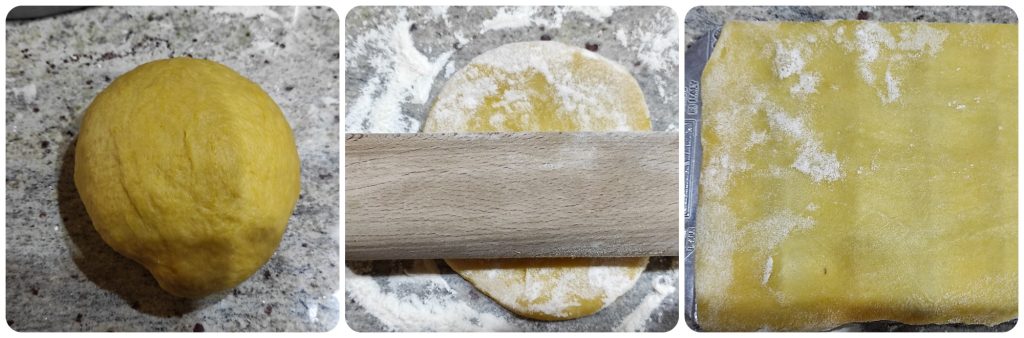
Resting (essential): Wrap the dough in plastic wrap (or cover it with an inverted bowl) and let it rest at room temperature for at least 1 hour. This step is crucial: it allows the gluten to relax, making the dough easier to roll and preventing it from springing back while you use the mold.
The secret to great ravioli is a dry, well-seasoned filling.
Browning the meat: In a non-stick pan, heat a drizzle of olive oil and add the ground meat. Let it cook over medium heat for at least 15 minutes, stirring often with a wooden spoon to break it up well.
Cooling: Once cooked, turn off the heat and let it cool completely. Pro tip: Never put hot filling on fresh pasta, otherwise the dough will become too moist and may break.
Preparing the filling mix: In a large bowl, combine the cooled meat with the other ingredients planned for your filling (such as Parmigiano, eggs or seasonings).
Perfect texture: If you prefer a finer, smoother filling (ideal for first-time mold users), briefly pass the mixture through a food processor or blender until you reach the desired texture.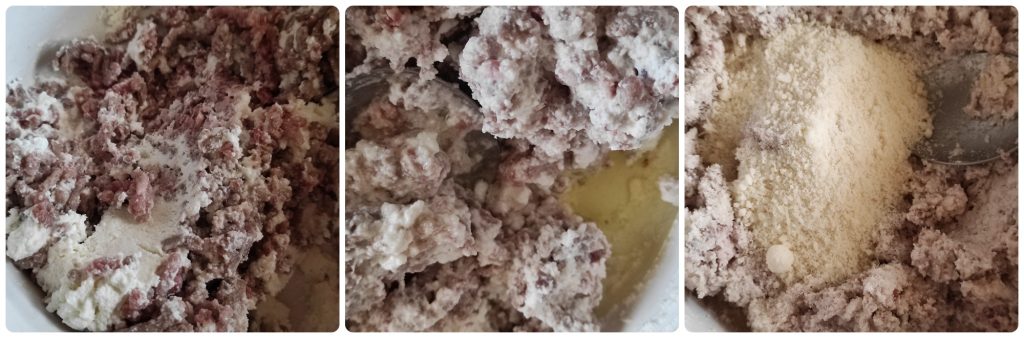
After the resting time, your dough will be elastic and ready to be turned into thin rectangles.
First rolling by hand: Take the dough and cut off a piece at a time (remember to keep the rest covered so it doesn’t dry out). Lightly flour the board and press the piece with the rolling pin to give it a rectangular shape.
Using the pasta machine (or “Nonna Papera”): Pass the rectangle of dough through the pasta machine, starting from the widest setting.
Thin but sturdy: Fold the dough over itself and pass it through several times, tightening the rollers a little at a time (one notch at a time) until you obtain thin, regular rectangular sheets.
The chef’s touch: The sheet for ravioli made with a mold shouldn’t be as transparent as a tissue, nor too thick. A thickness of about 0.04–0.08 in (approx. 1/32–1/16 in) is ideal to support the filling without opening during cooking.Now that you have the sheet ready and a flavorful filling, it’s time to shape your homemade ravioli.
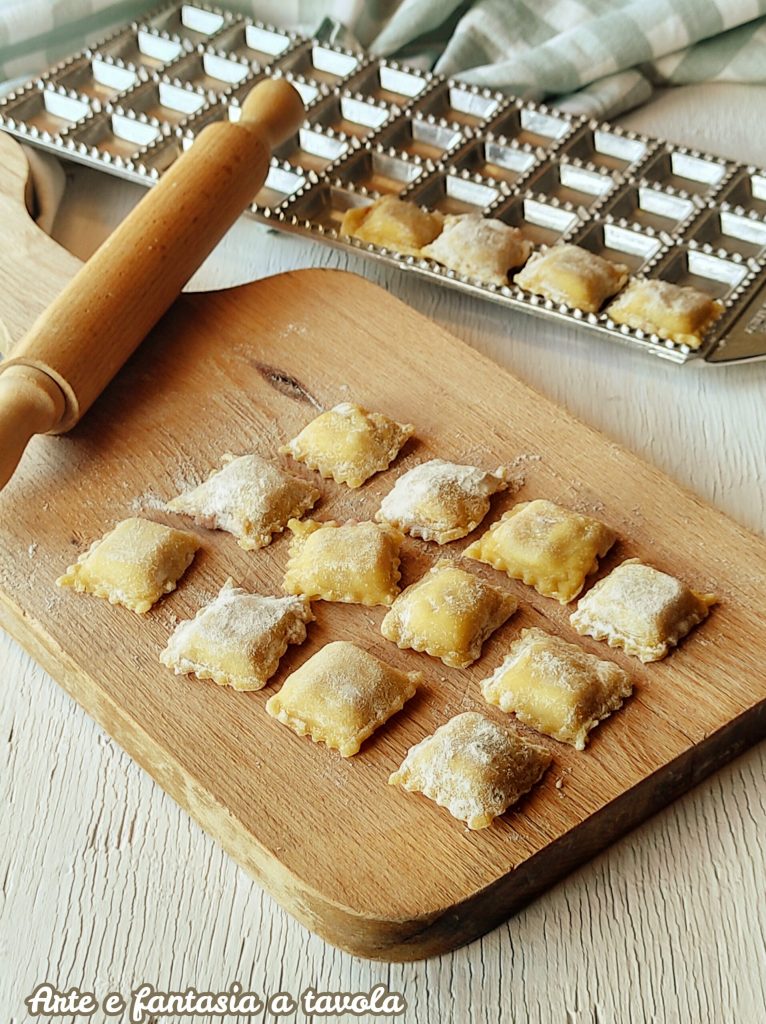
Prepare the mold: This is the fundamental trick. Generously flour the mold before laying the dough to prevent the ravioli from sticking to the bottom.
The bottom sheet: Lay the first rectangular sheet over the mold, keeping it slightly relaxed (don’t stretch it too much).
The filling: Place a small amount of filling in each cavity (about 1/4 tsp or a hazelnut-sized ball). Be precise and avoid getting the pasta edges dirty, otherwise they won’t seal properly.
Covering and the “air trick”: Lay a second sheet on top. Before sealing, gently press with your fingertips around each filling to push out any trapped air. Why do this? If air remains inside, the ravioli may open during boiling!
Perfect sealing: Roll the rolling pin (or the dedicated roller) firmly over the mold. The edges of the mold will cut the dough, perfectly separating each raviolo.
Using the scraps: Remove excess edges. Don’t throw them away! Re-knead the scraps to create new ravioli or, if the filling is finished, roughly cut them to obtain rustic maltagliati or tagliatelle.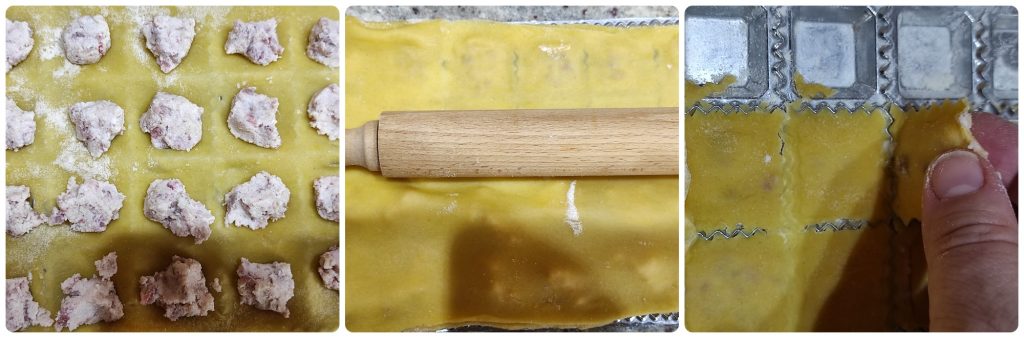
Your ravioli are ready! You can cook them immediately or let them dry on a floured tray for about an hour.
Cooking: Drop them into plenty of boiling salted water. Fresh pasta cooks very quickly: when they float to the surface, they are ready to be lifted out with a slotted spoon.
Sauce ideas: Thanks to the flavorful filling, these ravioli are excellent simply with melted butter, sage and a sprinkle of Parmigiano Reggiano. If you prefer something richer, a classic Bolognese ragù or a simple tomato and basil sauce will be perfect!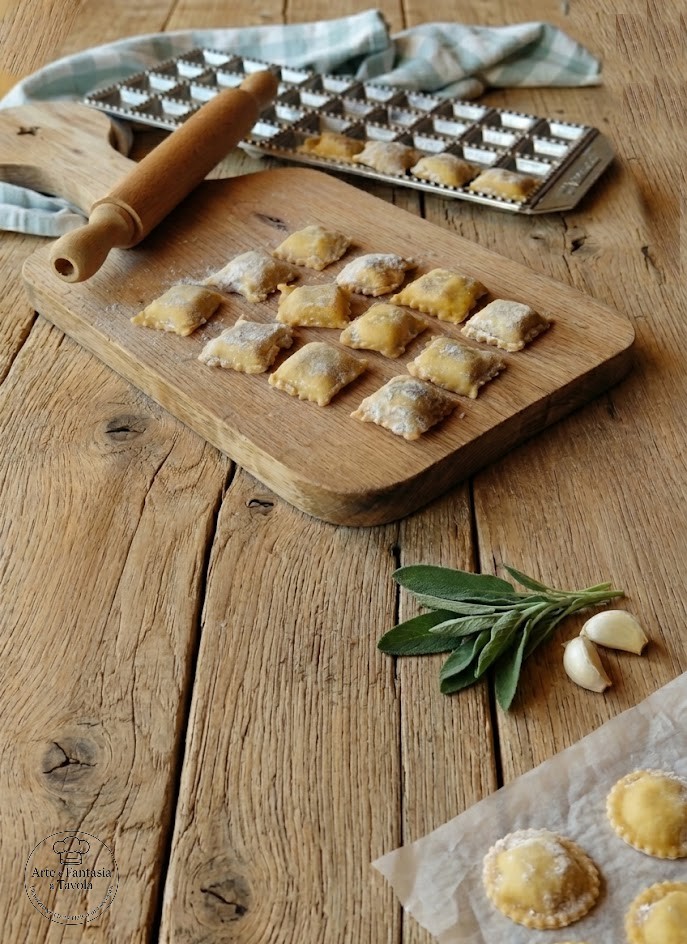
Have you tried this recipe? Let me know in the comments
Share Your Creation
Did you make this recipe too? I’d love to see your versions!
📷 Tag me on Instagram @camozzini.sonia or comment on the blog.
Together we can create a gallery of elegance and taste!
Follow me on All Channels
Want more ideas like this? Find me on:
⭐ On the official blog
⭐ On Instagram
⭐ On Pinterest
⭐ On Facebook
⭐ And of course on the new YouTube Channel
To not miss a recipe, join the channel and the Facebook group Arte e Fantasia a Tavola: a space to share passions, tips and cooking moments.
Thanks for Being Here
Thank you from the heart to everyone who visits these pages, leaves a comment, a like or simply a thought. Cooking is love, beauty, sharing. And every visit, every word, every shared recipe is part of this little world of taste and imagination.
Until the next recipe!
With affection,
Sonia – Arte e Fantasia a Tavola
Storage: how to keep your ravioli fresh
Homemade ravioli are delicate, especially if the filling contains meat or dairy. Here’s how to store them best:
In the refrigerator: You can store raw ravioli in the fridge for up to 24 hours, arranged on a floured tray and covered with a clean cloth or plastic wrap.
Freezing ravioli (best method): If you don’t eat them right away, the freezer is ideal. Place the mold or tray with the ravioli directly in the freezer for about 1 hour (this will firm them up separately). Once frozen, transfer them to freezer bags. They keep perfectly for 2–3 months.
Cooking from frozen: Do not thaw them! Drop them straight into boiling salted water. They’ll take only a couple of minutes longer than fresh ones.
Tips and tricks for a perfect result
Dough moisture: If the sheet seems too dry and doesn’t seal well between the two layers, slightly moisten the edges with a brush dipped in a bit of water or egg white before closing.
The right mold: If you use an aluminum mold, make sure it’s completely dry before flouring. Residual moisture is the number one enemy of fresh pasta!
Don’t overfill: Even if the temptation is to make them “nice and plump,” too much filling will prevent a hermetic seal, causing the raviolo to break during cooking.
Fun variations: unleash your creativity
This egg-based pasta is incredibly versatile. Here are some ways to personalize the recipe:
Filling variations
Vegetarian: A timeless classic with ricotta and well-drained spinach and a grating of nutmeg.
Autumn: Mantovana pumpkin roasted in the oven, Parmigiano and a pinch of crushed amaretti.
Fish: Sea bass or gilthead bream sautéed and blended with a drizzle of olive oil and grated lemon zest.
Sheet variations
Green pasta: Replace one egg with 50 g of cooked, well-drained spinach pureed to obtain colorful, flavorful ravioli.
FAQ (Questions and Answers)
Why do my ravioli open while cooking?
The main reason is air bubbles inside or a weak seal. Make sure to press well with your fingers around the filling before rolling the pin, and if the dough is too dry, slightly moisten the edges with a drop of water or egg white.
Can I use semolina flour instead of type 00?
Absolutely! You can use half type 00 and half durum wheat semolina to obtain a more “rough” and tenacious texture, typical of rustic fresh pasta. Semolina also helps prevent the ravioli from sticking to the mold.
What if I don’t have a ravioli mold?
No problem! You can roll out the sheet, place the filling mounds well spaced, cover with the second sheet and cut the ravioli with a fluted pastry wheel or a simple knife, sealing the edges with the tines of a fork.
How long should homemade ravioli cook?
Fresh pasta cooks very quickly. Generally 3–5 minutes in boiling water is enough. The trick is to taste them: when they float, wait one minute and then gently remove them with a slotted spoon.
Should the filling be cooked or raw?
For this meat-based recipe, it’s essential that the filling is already cooked and completely cold before placing it in the pasta. If you use cheese-based fillings (like ricotta and spinach), make sure they are well drained so they don’t over-moisten the dough.
